How To Choose The Right Roofing Contractor For Your Project
The roofing contractor you choose has a direct impact on your project’s quality and timeline. In this blog post, we’ll discuss the importance of thorough research and communication when choosing Roofing Missoula MT contractor.
Ask any potential contractors for references from past clients in your area. Ideally, these should be homeowners who have had work done similar to yours within a recent time frame.

Get Referrals
Getting referrals from trusted sources is one of the best ways to find a good roofing contractor. Referrals are based on genuine customer satisfaction and trust, making them more valuable than other types of marketing. You can ask for referrals from friends and family, your social media connections, or local business groups.
You can also check online reviews to see what other homeowners have had to say about a roofing contractor’s work and service. Look for comments about clear communication, prompt work, and reasonable prices. Avoid contractors who have only a few positive reviews or a large number of negative ones.
Make sure the roofing contractor you choose is licensed and insured. This protects you from liability if an accident or damage occurs during the project. Check that the insurance covers general liability as well as workers’ compensation.
Most regions require a building permit for roofing projects. Be wary of contractors who recommend skipping the permit process to save money or time, as this could put you at risk of fines and other legal issues.
You should also discuss payment terms before the project starts. Ideally, you will want to have an initial deposit, progress payments, and a final payment upon completion of the job. Avoid contractors who demand full payment upfront.
A reputable roofing contractor will be happy to provide you with photos and references from previous customers. This will give you a chance to see the quality of their work and discuss any concerns you may have. You can also visit a work site to see the crew in action. A good contractor will be respectful of your property and keep the work area clean and safe.
Read Reviews
Choosing a roofing contractor is an important investment, and you want to make sure you’re hiring someone you can trust with your home. The best way to do this is to check out their reputation, licensing, and insurance coverage. Additionally, it’s important to get multiple quotes and to ask questions. A well-chosen roofing contractor can save you money in the long run by installing a quality roof that will increase your property value and protect your home from costly repairs.
Read online reviews from previous customers to get a feel for each contractor’s customer service and work quality. Look for reviews that mention the specific roofing project you need, and prioritize companies with experience working with your type of roof. It’s also a good idea to request references from past clients and call them to discuss their experiences with the contractor.
Verify that the roofing contractor is licensed, insured, and bonded. This will protect you in case of any unforeseen issues during the project, and it will ensure that the contractor is following building codes and standards for safety and efficiency. In addition, you should be cautious of contractors who demand full payment upfront. Ideally, you should choose a contractor who requests a deposit and progress payments based on the completion of each milestone in your roofing project.
Ask each contractor to provide a detailed roofing quote, including an outline of the scope of work, materials, warranties, and payment schedule. Generally, the more detailed the quote is, the better. Be wary of any contractors that give vague or general estimates, as they may be hiding costs or lowering their standards to compete with lower-priced competitors.
Get Multiple Quotes
A well-executed roofing project can add substantial value to your home. It is therefore critical to find a contractor who will professionally complete the work, within a reasonable timeframe for a fair price. To make the best possible decision, homeowners should take time to evaluate and compare estimates from multiple contractors. This will help them become a smarter buyer, and ensure that they get the highest quality roof for their money.
Ask potential roofing contractors to provide you with a written quote that includes an itemized breakdown of materials and labor costs. You should also inquire about any extra charges that may apply, such as disposal of old roofing materials or permitting fees. It is also helpful to ask about their experience, and whether they have any relevant certifications or additional training.
In addition, homeowners should verify that the roofing contractor holds all required licenses and insurance coverage. Lastly, they should be willing to answer any questions you have about the scope of work, the materials and brands used, and their estimated timeline for completion.
A good roofing contractor should also be able to explain the details of their payment structure and should adhere to all local building codes and safety standards. They should also be able to provide you with any necessary warranty information. Finally, it is important to avoid contractors who demand full payment upfront. Instead, they should be able to offer you an acceptable payment schedule that involves an initial deposit, progress payments, and a final payment upon completion. This will help you protect your investment and avoid any surprises down the line. The right roofing contractor can make all the difference for your home and ensure that you get the highest quality care for one of the most significant investments you will ever make.
Ask Questions
Asking questions is the best way to ensure that you hire a reputable roofing contractor for your project. During the interview process, be sure to ask about their experience, insurance coverage, and more. The answers to these questions will help you decide if the roofing contractor is right for you.
One of the most important questions to ask is how long they’ve been in business. You want to choose a roofing contractor with at least a few years of experience. However, don’t be quick to write off a newer company. Many roofers spend time working for other roofing companies before starting their own. They may be just as qualified as a company that’s been around longer.
Also, be sure to ask about their safety practices and protocols. A reputable roofing contractor should prioritize the safety of their employees and adhere to all industry standards. Finally, ask about their payment structure. You want to find a roofing contractor who offers a fair payment schedule. Avoid companies that require full payment upfront.
Another question to ask is about their roofing materials. Do they offer a wide range of choices, including different styles, colors, and material types? If so, make sure to select a contractor who uses quality roofing materials that are guaranteed to last.
You should also ask about any warranties or guarantees that are offered. A reputable roofing contractor should be confident in their work and provide a warranty that covers both the materials and workmanship. In addition, they should offer a guarantee against leaks or other problems for a certain amount of time after completion. This is a great way to protect your investment and ensure that you’re satisfied with the work.
Get A Written Contract
A detailed written contract is one of the most important pieces of paperwork you can offer your customers. It sets you apart from roofing companies who rely on verbal agreements and handshake deals. It provides your customer with peace of mind and protects you against misunderstandings or disputes down the road.
The contract should detail all aspects of your service and project considerations including pricing, a timeline, guarantees, and other details. It should also include the required insurance documents for both parties. For example, some regions require that a roofing contractor be licensed and carry worker’s compensation insurance. If you’re unsure what your local requirements are, consult with your city or county’s Department of Building and Safety.
Ask potential contractors for references from past clients. Then contact those homeowners to find out if they were satisfied with the work and if any issues needed to be addressed. You can also check online reviews and testimonials to see what other people are saying about the contractor you’re considering.
A well-executed roofing project can add significant value to your home. So, be sure to choose a qualified professional who will complete the job promptly, within your budget, and with quality workmanship. And remember, always get a written estimate!
A roofing contract is a legally binding document that describes the scope of the services and any other considerations. It is usually signed by both parties and it specifies the terms and conditions that are agreed upon. Having a lawyer review the contract before you sign it can help to ensure that it contains clear and accurate terms that will protect you from any misinterpretations or misunderstandings down the road.
Tips For Deck Railing Installation
Installing deck rails is an important part of creating a safe and visually appealing outdoor space. A well-planned project is key to a successful installation and achieving the desired look.

Start by marking the positions of your posts using chalk or tape. Make sure these marks conform to local codes for post spacing. For professional help, contact Deck Builder Stafford.
The cost of Deck Railing Installation depends on a number of factors. The first is the material itself. There are a wide range of options from inexpensive composite to expensive premium materials. The railing width also affects cost. Narrow rails cost less than standard widths. Gates cost about twice as much per linear foot as the rest of the railing. Hardware, such as brackets and bolts, increases the overall cost of the project. Colors also affect price. Staining a deck costs $1 to $4 per square foot including materials, while painting typically runs $2 to $5 per square foot. Premium colors for composite railing can cost $10 to $18 more per linear foot than standard colors.
Another factor is the length of the railing and stair stringers. Longer rails and stairs require more labor to install, which increases the cost. The shape of the deck also affects labor and material costs. Complex or unique shapes of decks require more time to install and often need special hardware to ensure stability and safety.
Site preparation and any repairs needed to prepare the deck for the new railing add to the overall cost. This includes removing any existing railings, cleaning and preparing the deck surface. In some cases, this process may include repairing or replacing damaged deck boards and joists. This step is particularly important if the deck will be used for railings or stairs.
Post and baluster heights influence cost as well. The more expensive materials like premium composite or aluminum require higher-grade posts and balusters. This is to increase the structural integrity of the system, which can reduce the chance of swaying or bending under pressure.
The type of deck also influences the railing installation costs, as some materials require more maintenance than others. Wood, for example, must be sealed or stained every 1 to 2 years. This adds to the cost of maintaining a wood railing over time. Aluminum and steel railings are more durable and require less maintenance than wood, but they do cost more initially.
The contractor you choose to install the deck railing can also significantly impact the cost. Experienced and licensed contractors offer a better quality of work, but they generally cost more than unlicensed or inexperienced contractors. Professional contractors also know how to handle the permit and inspection process, which can save homeowners money in the long run.
Materials
Deck rails come in a wide variety of materials, each with its own advantages and disadvantages. Wood, metal, composite and glass are all popular choices. It is important to select a material that meets your needs and complies with local building codes. Before beginning the project check with your city planning or building department to determine if there are special permits required, and if any additional inspections must be completed before the installation can take place.
The first step is to prepare the deck area by cleaning and leveling the surface. If the deck is part of a second floor, be sure that it is properly anchored to the house or other framing. Consult with the manufacturer of your chosen railing system to see if there are any specific requirements for your location.
Depending on the style of your deck, you may want to include post caps on the rail posts or install a top rail to create a finished look. Some rail systems also require a small support piece that is installed between the bottom of the deck and the bottom of the rail posts.
Wood rails typically consist of two main parts: the rails and the balusters. Rails run horizontally between the posts and support the balusters, which are spaced vertically along the length of the rails to create a barrier that protects against falls from the deck.
Most wood railings are based on 4×4 wood posts, which must be secured to the deck frame and the framing of the house. The posts must be tall enough to comply with local building codes, and they should extend below the decking or finish so that the railing is safely attached to them.
Before mounting the posts, you should record the distance between them and mark on your deck the locations where the lag bolts will be placed. Use a level to ensure that the posts are perfectly vertical, or “plumb”. If not, they can cause the entire railing system to fail. Once the lag bolts are in place, the posts should be inserted into them and tightened until they are secure.
Installation
Adding railing to your deck is a great way to enhance its safety and aesthetics. It can also serve as a boundary delineator, helping you define the transition between indoor and outdoor spaces. In addition, it can help protect children and elderly people from falls. However, before you start installing your railing, it’s important to consult with the local planning and building department to determine if you need a permit or must meet any other requirements.
Depending on the complexity of your railing, it may take several hours to complete the installation process. It’s essential to follow the instructions provided by the manufacturer and use a professional grade drill, saw, tape measure, level and other tools. If you’re not comfortable working with power tools, it’s best to hire a professional contractor to perform the installation.
To install a deck railing, you must first mark the area where you want to install it on your posts. Use a tape measure to locate the center of each post, and make a mark on each one where you want your railing to go. Next, measure the distance between each post and record this measurement. You’ll need to know this number to determine how long your bottom rail pieces should be.
Once you’ve determined the length of your bottom rail, cut a piece of 1×3 or 2×4 lumber into the appropriate size. You can also use other materials, but you’ll need to check with your local building department to find out what is allowed in your area. You’ll also need to buy balusters, which are essentially vertical supports that form the framework of your railing.
Before installing your balusters, prepare them by sanding and staining them. Allow them to dry completely before you begin the installation process. Once you’ve finished the sanding and staining, mount the balusters on a strip of wood that is the same length as the distance between the posts. Secure the balusters to the strip using screws that are at least 1.5 inches (3.8 cm) long.
Lastly, install the top railing. Depending on your preferences, you can choose to have a simple straight or curved rail. You can also choose to include a handrail, which is typically made from metal or plastic.
Cleanup and Inspection
When a railing is installed, it needs to be regularly inspected to ensure its safety and stability. Regular inspections can identify and address issues before they become major problems, reducing the likelihood of injuries or structural damage. This process involves examining each component, looking for signs of wear and tear that may compromise its strength or integrity. This includes examining the joints, fasteners and connections, which are particularly vulnerable to weakening over time. It also includes checking the overall structure for any signs of warping or sagging, which could indicate structural problems that could affect the integrity of the deck and railing system.
Before beginning, it is important to clean the area where the railing will be installed, making sure there are no loose or broken parts that could pose a hazard to users. It is also important to prepare the deck surface before installing the railing, which may include removing existing railings or other obstacles that could interfere with proper installation. Proper site preparation can save time and money in the long run by identifying any issues that need to be addressed before starting the project.
Once the deck is ready for installation, begin by marking the location of posts using chalk or tape. This will ensure that the posts are properly positioned and comply with local building codes regarding post spacing and height. Once the posts are in place, use a level to make sure that they are straight and secure. The bottom rail board should be attached to the posts, using a connector or fascia mounts. Be sure to use corrosion-resistant screws or bolts, and predrill holes to prevent splitting.
Lastly, the handrails should be securely attached to the posts. Make sure the balusters (vertical slats on the railing) are not too close together, as this can cause them to become unstable. Ideally, the top rail should be lower than the bottom rail. This will keep the handrail safe and allow it to function properly as a safety feature.
After all the work is complete, it’s time to add the finishing touches. Consider adding caps on the ends of the posts, and add skirts at the base of the posts to conceal any gaps between the deck and the bottom of the railing. It is also a good idea to stain or seal the wood, which will protect it from moisture and the elements and help extend its lifespan.
How to Spot the Signs That You Need an Emergency Electrician
Every home, office, and business relies on a constant flow of electricity to function properly. Issues like a flickering light, a buzzing outlet, or a constantly tripping circuit breaker can be dangerous and should only be repaired by an emergency electrician.
Look for licensed professionals who offer 24/7 availability and fast response times. Ask friends, family, or neighbors who have used their services for recommendations. Contact Emergency Electrician Tampa now!

- Fuses Blow Too Often
When a fuse blows, it’s a sign that something is wrong and needs to be fixed. Faulty wiring, a broken appliance, or even a simple mistake can be the culprit, but knowing how to spot the problem is essential to avoid expensive repairs and keep your home safe from dangerous electrical issues.
If you have a fuse that keeps blowing, the first thing to do is check whether the fuse’s amperage rating is still correct. You must replace it with one with the same amperage rating if it isn’t. Then, remove any appliances from the circuit that may be causing an overload. Once you’ve done this, turn on a light or plug in an appliance to see if the new fuse has fixed the problem.
A short circuit most likely causes a fuse that constantly blows. This happens when current passes through a wire that doesn’t have an amperage rating orvels along a path it isn’t supposed to. Faultying, old or new appliances, and even rodents chewing through walls.
A can cause this other common cause of fuses blowing is that too many lights or plug-in appliances are being used on the same circuit. This is because these devices draw a lot of electricity and can lead to overheating, which in turn causes the fuse to blow. If this is the case, you’ll need to move some of these devices to other circuits or give them their own dedicated power outlets.
You’ll also need to change the fuse if it appears charred or broken, as this is an indication that there is a problem with the electrical wiring that goes through that fuse. If you notice this, it’s a good idea to contact an emergency electrician to investigate.
You should never try to fix a blown fuse or faulty wiring on your own, as this could be extremely dangerous. Always contact an emergency electrician if you’re worried about your safety or your house’s electrical system. A professional will be able to identify any problems and ensure they are repaired quickly and safely.
- Power Outlets Are Too Few
The average household uses a lot of electrical devices. You might have computers, televisions, phones, and tablets, along with appliances like dishwashers, washing machines, and refrigerators. If your home has only a few outlets in each room, it might be hard to find an open one for everything you need to plug in. Some people try to fix this problem by using power strips and extension cords, which create more space to plug things in. However, these temporary solutions may also increase the risk of overheating or causing a fire.
If you are worried about having enough power outlets in your home, it is important to get the help of an emergency electrician. They can install additional outlets and add circuits to ensure that your household’s power needs are met without compromising safety or creating a fire hazard.
A common sign that there is not enough power coming to your outlets is flickering lights. This occurs when an appliance draws too much electricity and briefly disrupts the flow of current. An emergency electrician can help you address this issue by installing extra outlets and possibly giving large appliances, like your oven or air conditioning unit, their own dedicated circuit.
Other signs of not having enough power include frequent tripping of the breakers and outlets that feel hot to the touch. If you notice any of these issues, call a local emergency electrician as soon as possible.
While some people try to avoid these problems by following simple safety tips, it is often impossible to prevent them all. A regular inspection by an experienced emergency electrician can help you identify and prevent potential hazards before they become serious.
When looking for an emergency electrician, make sure to choose a company that charges a flat fee instead of an hourly rate. Companies that charge an hourly rate often take longer to complete the repairs and will end up charging you more money in the long run. By choosing a reputable emergency electrician that offers a flat-fee option, you can save money and receive quality services at the same time.
- Light Bulbs Are Burning Fast
If you notice light bulbs burning out quickly or even flickering, this is a sign that the voltage in your home is too high for its wiring. This is a serious problem that needs to be addressed by a licensed electrician before it causes house fires.
You may also notice the smell of burning plastic or see black marks on electrical outlets and switches. This is another indication that the electricity is faulty, and it is best to turn off the power supply before calling an emergency electrician to inspect and repair your system.
While you wait for an emergency electrician to arrive, it is a good idea to keep some essential safety items handy. You should also familiarize yourself with your electrical panel so that you know how to shut off power to different areas of your home in case of an emergency.
One of the most common signs that it is time to call an emergency electrician is seeing soot on the bottom of an outlet or when you plug something into a socket and it spits sparks for a split second. If you notice that any of these things are happening, it is best to turn off the electricity at your circuit breaker and contact a licensed emergency electrician immediately.
When you do find yourself in need of an emergency electrician, make sure to find one that charges a flat fee for emergency repairs. Electricians who charge an hourly rate are more likely to take longer to complete the job, which means they will end up charging you more than an electrician that charges a flat fee.
If you have any questions about the best ways to prepare for an emergency, call Lippolis Electric. We have a team of emergency electricians ready to help with all your electrical issues, day or night. We can help you identify whether it is a real electrical emergency and then provide the emergency repairs that are needed right away. Call us to schedule an appointment today. Our services are available to residents of Louisville, KY, and the surrounding area.
- Circuits Keep Tripping
There are some electrical issues that simply can’t wait. For instance, if you lose power in your entire home and can’t turn on the lights, you should immediately seek professional help.
A burning odor or sparking outlets are also signs that you need an emergency electrician right away. You should never ignore these signals, as they could put your safety and that of your loved ones at risk.
When choosing an emergency electrician, be sure to consider their reputation in the local community. If possible, find out if any of your friends or family members have used their services and if they were happy with the service. You can also search for reviews online to build up a list of options.
You should also ensure that the emergency electrician you choose has the necessary qualifications and experience to deal with your issue. As electrical work is very delicate and dangerous, you want to be certain that the person you hire has the skills to complete the job safely.
Lastly, be sure to ask the emergency electrician you’re considering about their time reliability. It’s important that they arrive at your home as soon as possible and stay until the job is done. You don’t want to have to wait all day for a technician.
If you’re looking for an emergency electrician, Turn It On Electric can connect you with top-rated pros in your area. Simply enter your zip below to get started! We’ll match you with up to 3 pre-screened pros based on your needs. You’ll be able to compare their quotes, credentials and more before making your decision. It’s simple and easy! If you have any questions, feel free to give us a call or chat with one of our online experts. We’re always here to help!
Colonoscopy: Is it Painless?
Colonoscopy Phoenix is a very effective procedure to check for colon cancer and polyps. The test is surprisingly quick and painless with the use of sedation.
During the exam, you lie on your side with your knees drawn toward your chest. The doctor inserts the colonoscope into your rectum and watches a video of your large intestine on a monitor. They pump air or carbon dioxide into your colon to inflate it, which helps them see the lining of the colon better.

Most colonoscopies involve sedation, and people with this test often say it wasn’t painful. This is because a person does not feel pain when asleep, and sedation makes them go to sleep. A 2018 study found that most people who had colonoscopies did not report any pain at all. Some people choose not to have sedation, and they do experience some discomfort during the procedure. However, if the doctor has the right equipment and skills, the colonoscopy should not be painful.
A person needs to prepare for a colonoscopy by taking laxatives for a day or two before the procedure. This can cause cramping and diarrhea, but it is necessary for the procedure to be done properly. During the procedure, a lubricated tube will be inserted into the anus and rectum. The doctor will use the lubricated tube to move through the entire colon and the rectum.
During the procedure, the doctor will also look for polyps. If a polyp is pre-cancerous, the doctor will remove it from the colon and send it to a lab for further examination. This will reduce the risk of cancer in the future.
After the procedure, a patient will spend about an hour in the hospital or surgery center, so the doctor can check their vital signs. During this time, they will give the patient some water and food to drink. Afterward, the doctor will tell you what they found and explain any procedures they performed. They will also let you know if they took tissue for biopsy. If they did, you will not get the results until a few days or weeks later.
Many people avoid having a colonoscopy because they are afraid of the process, but it is a safe and effective way to diagnose colon problems. It is a simple and quick procedure that can help detect colon cancer early and treat it before it gets worse. It can also identify other problems, such as a bowel obstruction, diverticulosis, or other abnormalities.
It’s quick
During your colonoscopy, the doctor will use a special camera to look at your large intestine. This is done under sedation or general anesthesia, so you won’t feel anything during the procedure. The entire procedure lasts about 30 minutes. In addition, the doctor may need to remove polyps that are found during the test. This can add an additional 15 minutes to your procedure time.
Getting a colonoscopy is important for people who want to stay healthy and prevent colorectal cancer. A colonoscopy allows doctors to catch pre-cancerous polyps and remove them before they become cancerous. It can also help detect colorectal cancer in the early stages, which increases your chances of survival. A single night of discomfort is a small price to pay to keep you from dying of colorectal cancer.
To prepare for your colonoscopy, avoid all solid foods and drink only clear liquids. The day before the procedure, you should start drinking liquids at breakfast. You should continue this diet until the doctor instructs you to stop. You should also take a laxative to empty your colon before the procedure. In some cases, the doctor may prescribe an enema if you can’t tolerate oral laxatives.
Colonoscopies are performed under general anesthesia or sedation, so you will not be able to drive after the procedure. It is recommended that you arrange for a ride home after the procedure. Also, you should be within two hours of a medical center after the colonoscopy to reduce your risk of bleeding.
The sedative will wear off soon after your procedure. After that, you will be able to eat and drink whatever you want. However, you should drink a lot of water to replenish your fluids after the colonoscopy.
A quick and easy colonoscopy can save your life from colorectal cancer. It is a routine test that you should have every 10 years. If you have a family history of polyps or colorectal cancer, you should do it sooner.
The most difficult part of a colonoscopy is the prep. It is essential to get it right the first time, since failure to do so will result in a repeat colonoscopy or missing cancerous polyps. The day of your colonoscopy, you should wear loose-fitting clothing and avoid any tight pants or shorts. This will make it easier for you to move around when taking bathroom breaks. You should also invest in some flushable toilet paper, as you will need to wipe frequently during the colonoscopy.
It’s safe
A colonoscopy is a safe procedure that can help find polyps and precancerous cells before they turn into cancer. However, the results of this test can be a bit confusing. In a study, people who had regular screenings were less likely to die from colon cancer, but the benefit only lasted if they actually went for the tests.
You will be given a sedative for your comfort during the procedure, and you might feel pressure, bloating or cramping. If you are worried about discomfort, talk to your doctor. They may be able to give you additional medication to control pain after the colonoscopy. You will also be told not to drink alcohol for the day before the exam because it can interact with the sedatives used during the procedure.
In addition to identifying precancerous tissue, the colonoscope can also be used to remove small growths or polyps. This procedure can add up to an hour to the total procedure time if your doctor needs to take samples.
Occasionally, polyps and biopsy tissue can bleed during the procedure. This is normal and not a cause for alarm, but it’s important to tell your doctor right away if you notice more than a teaspoon of blood in your stool.
While there are other ways to detect colon cancer, the only way to prevent it is to get a routine colonoscopy. You should go to your doctor for a colonoscopy if you have a first-degree relative diagnosed with colon cancer, unexplained weight loss or bowel changes, iron deficiency anemia, symptoms of Crohn’s disease or ulcerative colitis and sigmoid volvulus.
In some cases, a colonoscopy can be used to diagnose and treat conditions such as gastroesophageal reflux disease (GERD), diverticulitis, and inflammatory bowel diseases like Crohn’s and ulcerative colitis. These procedures are also helpful for diagnosing and planning for surgical interventions in inflammatory, mechanical, and anatomic problems like sigmoid volvulus and Crohn’s disease.
The U.S. Preventive Services Task Force recommends that people between the ages of 45 and 75 get a regular screening colonoscopy. A colonoscopy is the best way to identify abnormalities in the large intestine, including polyps and early-stage, curable colon cancer. These procedures can save lives by preventing the development of invasive, life-threatening colon cancer.
It’s affordable
The availability and affordability of colonoscopies have a significant impact on whether people receive the life-saving procedure. Despite their benefits, however, many patients have difficulty getting access to the test due to cost and fear. The procedure is invasive and requires the colon to be cleaned, which can make some patients uncomfortable. It also creates barriers for people who do not have adequate insurance coverage. In addition, there are noninvasive alternatives for colorectal cancer screening that may be more convenient and effective.
Health insurers cover the cost of colonoscopies for people under 45 based on expert medical guidelines, but some patients still face high costs. These fees can be a deterrent to the procedure, especially for people who are at high risk of colon cancer. This is why alternative options for colorectal cancer screening are important. Some of these include noninvasive stool tests, including high-sensitivity guaiac fecal occult blood testing and fecal immunochemical tests.
In general, patients should always ask their healthcare providers if they are in-network before the procedure. This can help avoid any surprise charges and prevent any unnecessary out-of-pocket expenses. You should also be aware of whether the doctor will use an in-network anesthesiologist. If a patient is charged an out-of-network anesthesiologist, it is a good idea to file a claim with the insurance company to get this fee reversed.
The costs of a colonoscopy in New York can vary widely, depending on where the procedure is performed and whether it is considered a diagnostic or screening exam. Some private insurance companies require patients to pay a deductible or coinsurance. However, most Medicare Advantage plans provide free screening colonoscopies for qualified patients.
Colonoscopies are usually performed at a surgery center or outpatient hospital, but some patients are at higher risk of complications from the procedure and may need to be admitted to the hospital for sedation. Surgery centers are regulated differently by the state than hospitals, and they can charge less for procedures. They also have fewer amenities and don’t offer the full range of support services that hospitals do.
What You Need to Know About Roof Repair
Roof repair is the process of fixing components that are damaged or leaking. However, a slew of factors can damage your roof, including storms, whirlwinds and even tornadoes.

Water stains on ceilings and walls, mold growth and a sagging roof are all indicators that your roof needs to be repaired or replaced. A thorough inspection is essential to determine the extent of the damage.
While shingles and tiles aren’t as vulnerable to damage as other roofing materials, they still require attention. Cracked, torn or missing shingles should always be repaired right away before the weather turns. This protects the roof deck from water intrusion and prevents mold and mildew inside the home.
Storms often wreak havoc on shingle and tile roofs. The most obvious sign is a section of missing shingles, which can leave the roof exposed to moisture and allow water into your home. Even a single missing shingle can cause the other shingles to degrade faster than they would otherwise.
Blistering is another common shingle issue. This occurs when a shingle is subjected to extreme heat or pressure from a strong wind. The granules on the surface of the shingle melt, leaving behind an area that is darker in color than the surrounding shingles. Blistering is more common in areas with harsh sunlight.
A sagging roof or damp attic are further indications that your roof needs repair. Moisture can penetrate the roof decking and damage insulation, leading to rot and structural issues. If left unchecked, these problems can result in leaks or mold.
Discolored or faded shingles may also indicate that they’re deteriorating. The granules that give shingles their color help them shed rain and UV rays, so when these shingles are damaged, they can’t protect your home.
Moss and algae growth are another common indicator that your roof needs repair. These types of fungi retain moisture, which speed up the deterioration of your shingles and other roofing materials.
If you see any moss or algae growing on your roof, it’s crucial to contact a roofing contractor immediately. They will use a power washer to kill the fungi and prevent them from returning.
If a shingle is simply cracked, rather than torn or missing, it can be repaired with a bit of roofing sealant. First, remove the nails from the damaged shingle. Then, slide a new shingle under the existing shingles and nail it through its nail strip. Make sure the shingle is centered over the damaged shingle and cover the entire nail strip with additional sealant.
Built-Up Roofing
Built-up roofing, or BUR for short, is a long-established roof system that’s effective in many different geographic areas and climates. It’s comprised of multiple layers of asphalt that get applied between ply sheets (or felts) over the roof deck and insulation.
Because of this, built-up roofs are typically less prone to leaks than other types of commercial roofing systems. However, that doesn’t mean they’re maintenance-free and can’t experience problems like clogged drains or other issues that can lead to water ponding or other damage to the building structure.
One issue that can occur with built-up roofs is blistering. Blistering occurs when moisture builds up between the layers of the roof membrane. This can be caused by a lack of proper installation, a leaking gutter, or undetected roof leaks. When blisters occur, they need to be repaired as soon as possible to prevent further moisture damage and potential roof layer tearing.
Repairing a built-up roof is usually done by spudding the surface of the membrane, brushing and applying a base course of asphalt and fabric. Afterwards, a light colored gravel or sand can be sprinkled on top to reflect the sun’s heat and speed up the drying process.
Since built-up roofing is made of multiple layers, it’s difficult to pinpoint the source of a leak. This is why it’s important to have a skilled service crew that can evaluate the entire roof and diagnose any potential sources of leaks.
A good way to avoid major leaks is to schedule regular inspections with a trusted roofing company. They can help you to find and fix small leaks before they become worse and help your built-up roof extend its lifespan. A regularly scheduled inspection also helps to catch potential structural damages early, which can save you thousands of dollars in repair costs down the road. Schedule a demo of Q Ware today to see how our data-driven reports can empower you to make better decisions about repairs, replacements, and overall roof management strategies.
Roof Leaks
A leaking roof can cause significant damage to your ceilings, walls, and foundations. It also leads to the growth of mildew and mold, which can be a health risk for your family. It’s important to fix a leaky roof as soon as possible, so you can avoid further damage and costly repairs.
There are several different causes of roof leaks, including damaged shingles and flashing, clogged gutters, and improperly sealed roof vents. Check for water stains and discoloration on your ceilings, walls, and floors to find the source of the problem. You should also check in your attic and crawl space for signs of water damage.
If you’ve found the source of a leak, you can do a few things to repair it until a professional can arrive. For example, you can cover the area with a tarp to prevent further damage and water accumulation. If you’re not comfortable working on a roof, it’s best to call a roofing contractor to handle the repair.
The most common and urgent sign of a leaky roof is active dripping. Dripping water is a surefire indication that you need to act quickly to avoid further damage and health hazards. Water that dries and re-moistens can damage your ceilings, walls, furniture, and electrical systems. It can even rot the wooden framing of your roof and weaken its overall integrity.
Leaky roofs can be caused by a variety of issues, including old shingles and flashing, clogged or missing gutters, and damaged or rusted vents. To prevent a roof leak, you can replace the flashing around chimneys and skylights, inspect all pipes and vents for proper sealing, and make any necessary adjustments to your attic ventilation.
If you can’t identify the source of a leak, try soaking different areas of your roof with a garden hose. Have someone inside the house watching for telltale drips, and have them yell as soon as they see one. This will help narrow down the location of the leak, and make it easier to locate by a professional.
Insurance Coverage
Homeowners insurance typically covers damage to a roof as long as it’s caused by a covered peril like fire or wind. However, if the roof is damaged due to general wear and tear or lack of maintenance, the insurance company won’t cover the repair. This is why it’s important to keep up with regular maintenance and inspections.
Home insurance also typically covers any debris that falls on a roof from a storm. If your roof is in need of repairs after a storm, make sure you document the damage and get quotes for the repairs before calling your insurance agent. This will give you the best chance of having the repair costs covered by your insurance policy.
If the roof is severely damaged and needs to be replaced, most insurance policies will cover the cost up to a certain amount, minus any applicable deductible. This will typically cover not only the new shingles or tiles but the structural damage as well.
The specifics of what’s covered by your insurance will depend on your specific policy, but most homeowners policies will have a section for dwelling coverage and another one for other structures. These other structure sections usually specify what parts of your roof are covered by the policy and for which events. For example, you may have a separate section that specifies that your roof is covered in the event of a tree falling during a windstorm or an extended hailstorm.
It’s also a good idea to read through your specific policy carefully and ask an insurance agent if you have any questions. If your roof is leaking or otherwise damaged, you should hire a professional to make temporary repairs until an insurance adjuster can inspect it and approve a claim.
It’s also worth noting that if your roof is less than 10 years old, it will probably be fully covered by your insurance policy. On the other hand, if your roof is older than this, the insurance company will likely depreciate it and only pay you for a fraction of its actual cost.
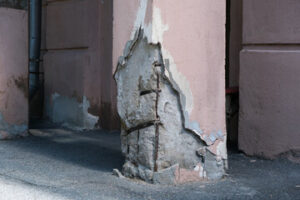
The Importance of Concrete Repair in Your Home
Concrete Repair Eau Claire is a cost-effective solution to fix structural issues that can cause trip hazards on your property. It is also a more environmentally responsible option than tearing down your current concrete and pouring new.
Understanding the different concrete repair methods is key to achieving long-lasting results. We’ll explore crack injection, concrete patching and caulking, concrete raising, carbon fiber reinforcement and concrete overlay.
Concrete is a very strong material, but it is not without its faults. Uneven drying, shrinkage and temperature changes are just a few of the conditions that can cause cracks in concrete. Keeping an eye out for these issues can help you to identify and repair them before they become worse.
When it comes to repairing concrete cracks, the most important thing is to ensure that you are using the correct method for the type of crack you are dealing with. For example, if the cracks are shallow and running across the surface of the slab, you can use a simple concrete patching compound or filler to resolve the problem. This is a quick and inexpensive solution that will stop any water from seeping through the cracks and into the surrounding area.
For narrower cracks that run vertically, you can repair them using a more durable epoxy injection technique. This is a cost-effective and long-lasting option that will ensure that the cracks do not return in the future. This is particularly suited to cracked concrete that has been subjected to pressure, such as in the case of foundations or driveways.
Before you apply any concrete repair product, make sure that the crack is clean and free of debris. This step is often overlooked, but it is vital to ensuring that the concrete patching compound will adhere properly. You should also apply a thin layer of bonding adhesive to the area before applying any product. This will improve adhesion and increase resilience and flexibility.
If you are dealing with a wide crack, it may be necessary to use a hammer and chisel to widen the crack slightly. This will allow the patching compound to fit properly into the crack. Once the compound has been applied, you should smooth it out for a uniform finish. You can then cover the area with a protective coating. There are a number of different types of coatings available, including water-based acrylic, epoxy and polyurethane. Each has its own benefits, so you should choose the one that best meets your needs.
Leaks
Seeing water in the concrete around your home may seem like an inconvenience, but it can lead to serious problems and costly repairs. It is important to keep an eye out for water-damaged concrete, as it can be a sign of structural issues and mold growth. It is also vital to repair these issues as soon as possible. Leaks are particularly dangerous, as they can cause major damage and even structural failure in your home. Some leaks are easy to spot, such as a dripping faucet or a leaky toilet base, but others are much more difficult to detect. The most dangerous leaks are hidden from view, such as those in the plumbing pipes beneath your home’s concrete slab floor. If you suspect you have a slab leak, it is crucial to find and fix the problem quickly before it causes further damage.
Slab leaks can be caused by many factors, including corrosion, deterioration, or damage to your home’s plumbing system. They can be very difficult to detect, as they often go unnoticed until significant damage has already occurred. It is important to watch for signs of slab leaks, such as a sudden, unexplained increase in your water bill. You should also listen for sounds of running water in places you know it shouldn’t be running.
Water damage to concrete can be very destructive, especially when it is in the form of cracks. Cracks allow moisture to enter the concrete grains, causing them to move apart and lose their strength. It is also common for mold spores to grow within these cracks, as they provide them with a perfect breeding ground. The best way to avoid these problems is to have your concrete properly sealed.
A proper concrete repair should include an efflorescence removal process to remove the water soluble salts from the surface of the concrete. This step can be accomplished with a variety of cleaners, including mild acids such as muriatic acid or specialized efflorescence cleaners. Then the concrete is power washed to remove any remaining debris and dirt. After that, a chemical bonding agent can be applied to the surface of the concrete to improve adhesion and durability.
Loose Slabs
Concrete slabs that are loose or sinking may be a safety hazard and should be repaired promptly before they break off completely. These issues often occur because the sub-base beneath a concrete slab is not well prepared or erosion has occurred. Sunken concrete is a common problem for sidewalks, patios and other outdoor areas and can also be caused by excessive soil moisture, ground movement or poor installation. This type of repair is much more difficult to do yourself than cracks and leaks and requires a professional.
While resurfacing compounds, patch kits and overlays can work for a time to reduce the appearance of a sunken slab, they will likely break off as the concrete expands and contracts naturally. This is because these products don’t actually bond with the underlying concrete. A more permanent solution is underpinning, which involves excavating under your concrete slab and installing piers that reach down to stable soil underneath. This will support the concrete from below and slow further structural damage.
To fix a loose slab, it’s important to first carefully remove any loose debris. Next, use a spirit level to check the surface is flat and not sloping in any direction. If it is, a simple pointing mortar mix of three spades of sharp sand and one spade of cement can be used to fill the gap. The mixture should be poured into the crack and spread with a pointing trowel until it is full and even. It is important to move quickly at this stage as waiting even a few minutes can cause the consistency of the mixture to change.
Once the new mortar is set, it’s a good idea to apply two coats of Cure ‘N Seal with a pump sprayer or roller. This will allow the concrete to cure properly and improve its water resistance, stain resistance and appearance. Once the coatings have dried, it’s a good idea to remove the painter’s tape and allow the area to be trafficked once again.
Uneven concrete slabs aren’t just a trip hazard, they can be incredibly dangerous and send people to the hospital. Using a product like Sakrete Top’N Bond, an uneven slab can be fixed quickly and cost-effectively to eliminate tripping hazards.
Structural Damage
Concrete structures are subjected to a range of forces from external loads, internal movement and weathering. It is vitally important to ensure the structure can withstand these conditions without failure or significant damage. This is why the condition of any concrete structure must be regularly assessed, and if needed, repaired by professionals.
Concrete repair and restoration contractors are specialists who can assist with a variety of issues caused by ageing, improper construction, water infiltration and seismic activity. They have years of experience and expertise and provide quality, high-performance concrete repair materials.
The most common structural damage is surface cracking, resulting from shrinkage during the curing process or due to the presence of chloride contamination. This can be addressed by injecting epoxy to fill in the cracks and prevent further deterioration. However, cracks may occur for other reasons such as excessive loading, structural overload, movement or settlement of the foundation. These are more serious issues and need professional assessment and repair methods.
Other structural damage may involve spalling, where surface fragments break off the concrete, usually due to freeze-thaw cycles or corrosion of reinforcing steel. This is more serious and can threaten the integrity of the entire structure. This requires extensive structural evaluation, inspection of the reinforcement and, in severe cases, core sampling to determine the cause of the corrosion.
A wide range of repair techniques can be used, depending on the root cause of the deterioration. This includes repairing corrosion, improving the design of the structure and introducing drainage systems to prevent water infiltration. It can also include applying chemical treatments, using a concrete resurfacer, or replacing the damaged area with a new slab.
All repair methods begin with the correct preparation of the damaged concrete surface. This includes removing loose and damaged material, thoroughly cleaning the concrete and ensuring that the substrate is dry. Surface preparation is particularly important for achieving good adhesion of the repair material. A hot day can rob the new repair material of its moisture, leading to failure. Therefore, it is essential to spray the concrete with water before applying the new repair material.
How to Fix Common Plumbing Problems
Joe’s Plumbing involves the distribution of water, waste, and other fluids to and from fixtures like sinks, toilets, and appliances. It also includes the installation and repair of pipes.
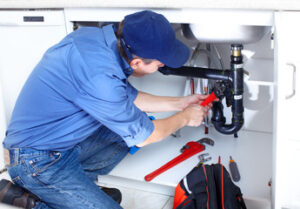
Plumbers often work in commercial and industrial settings. They must collaborate with other professionals to ensure plumbing systems integrate seamlessly into building projects.
Occasionally, faucets need repairs to keep them running smoothly. Fortunately, replacing small parts like washers and O-rings is easy and inexpensive. Regular cleaning can also prevent mineral and grime buildup. If a leak persists, it may be time to call a plumber for a professional repair.
Examine the leaking faucet closely to determine where the problem is occurring. Leaks from the spout or base will require a different fix than a drip from the handle. Turn off the water supply valves under the sink to prevent water from flowing while you’re working. Open the faucet in its center position to relieve pressure and let any remaining water drain out.
If the valve seat is leaking, it will need to be replaced. To do so, first remove the faucet handle. Then, pry off the decorative cap (if applicable) and unscrew the set screw with a screwdriver. This will expose an Allen screw that needs to be tightened. Use a wrench to loosen the screw, then lift off the handle. Next, unscrew the dome assembly from underneath the handle and pull it off.
The valve seat may be clogged with mineral deposits, which can cause it to leak. To clean the seat, remove the faucet handle and pry off the decorative cap (if applicable). Then, remove the retaining nut or clip from the valve stem to access the screw that holds the stem in place. Undo the screw and remove the stem, then clean the valve seat with white vinegar or another mild degreaser. After the seat and O-ring are cleaned, reassemble the faucet, turn on the water and test for leaks.
If the stem or cartridge is leaking, it will need to be removed and replaced. Obtain the new part from a hardware or plumbing supply specialist and follow the instructions to remove the old one and install the new one. Once the new part is in place, turn on the water and test for leaks.
Replacing a regulator can be difficult because it’s usually installed behind the wall. Before beginning the project, put a bucket beneath the current regulator to catch any water that might spill out. Start by shutting off the water at the main valve, then opening the faucet in the “off” position to relieve pressure and drain the pipes. Then, use a pair of channellock pliers to loosen and remove the existing regulator. Replace the old pipe end with the new end and tighten the couplings by hand.
Replacing a Faucet Part
Faucets are a convenient and functional part of kitchen and bathroom plumbing. Unfortunately, they can wear out and require replacement parts to function properly. Fortunately, replacing faucet parts is generally fairly simple for homeowners that are comfortable with basic DIY plumbing. However, if you’re not familiar with the basics of repairing faucets, it might be worth hiring a professional plumber instead. A professional will have the specialized tools needed to ensure the job is done correctly.
Before replacing any parts, make sure you turn off your home’s water supply valves. This will prevent any unwanted water from shooting out during the repair process, reducing risk of injury and mess. Additionally, it will allow you to work without worrying about the possibility of water damage to your property and possessions.
After the water is turned off, take a moment to drain the sink. This will reduce the amount of water left behind after disassembly and help you to identify any leaks or problems you may encounter during the repair process. It’s also a good idea to cover drains with a drain plug or an old rag to keep small faucet parts from falling down the drain and becoming lost.
If your leak originates near the base of the faucet, it could be caused by a loose packing nut or adjusting ring. If the leak is close to the spout, it could be a problem with the washer that sits on the valve seat or a corroded valve seat. The latter is common in compression faucets, where mineral deposits can clog or erode the valve seat over time.
Once you have identified the source of your leak, you can remove the faucet handle, spout assembly, and valve stem to begin the replacement process. Before beginning, be sure to replace the valve seat washer to avoid further problems with your faucet. It’s a good idea to consult the manufacturer’s specs sheet or online support center to ensure you’re purchasing a replacement that’s an exact match for your faucet model.
A leaking faucet can lead to expensive water bills and long-term damage to surfaces, appliances, and even structures like walls and floors. It can also create a breeding ground for dangerous mold. To avoid the headaches associated with a leaking faucet, it’s important to fix it as soon as possible.
Replacing a Faucet Handle
A stuck faucet handle is one of the most common plumbing problems. The good news is that it’s often easy to fix, especially if you know what to look for and have the right tools on hand. Whether your handle is difficult to turn because of mineral buildup or because it just feels loose, these tips will help you get it back in working order.
First, make sure the water is turned off completely. If you don’t, you could be sprayed with hot water or end up losing a small screw or piece of debris down the drain. Cover the drain with a rag or piece of tape to prevent this from happening. Once the water is off, you’ll want to remove the handle and decorative cap (if applicable) to expose the screw holding it in place. Use a flathead screwdriver to pry off the decorative cap and the set screw underneath. Once the set screw is removed, pull up on the handle to remove it from the stem.
If the handle is still hard to turn, it may be due to mineral buildup or corrosion that’s building up inside of it. Cleaning it with vinegar or another type of degreaser should help loosen it up. If the problem persists, you can try rubbing the inside of the handle with steel wool to smooth out the surface and reduce friction. Alternatively, you can try using a penetrating oil such as WD-40 around the base of the handle where it attaches to the stem. If the handle is still difficult to turn, you should replace it.
Once you have the replacement handle in hand, it’s time to reassemble the faucet. Start by screwing the new handle onto the stem, making sure it’s tight and aligned correctly. Next, add a washer and an O-ring to the cartridge (if applicable). If you’re replacing the cartridge, be sure to bring the old one with you to the hardware store so you can find an exact match. After installing the cartridge, use plumber’s grease to lubricate it so it inserts smoothly into the faucet body and doesn’t leak.
Replacing a Faucet Cartridge
Cartridge-type faucets are prone to developing problems that can cause them to leak. If you’re experiencing persistent dripping when the faucet is turned off, the cartridge may need to be replaced. This is a relatively simple process that can be done by anyone with basic plumbing skills.
Shut Off the Water Supply
Before beginning any work, shut off the water supply to the faucet by turning the valves under the sink clockwise. This will prevent any accidental water flow while you’re working.
Remove the Faucet Handle
Once the water supply is off, you’ll need to remove the handle in order to gain access to the cartridge. Depending on the type of faucet you have, this may involve unscrewing a screw that secures the handle or removing a decorative cap or retaining nut.
The Cartridge
The cartridge is the component that regulates the temperature and volume of water flowing from the faucet. It’s held in place by a retainer clip that’s usually secured with a nut inside the faucet body. Older faucets may have a large retaining nut that’s exposed once the handle is removed, while newer models may have a decorative collar or other components that need to be removed before you can reach the retaining nut.
Once you’ve accessed the retaining nut, use an adjustable wrench or channel-type pliers to loosen and remove it. Once the nut is off, carefully remove the cartridge from its housing.
Reassemble the Cartridge
Reassemble the new cartridge by inserting it into the cartridge housing, taking care to align the cartridge tabs with the retaining clip notches or slots. You may need to gently twist the cartridge a bit while inserting it to help ensure that it is properly seated.
It’s a good idea to lubricate the cartridge, particularly if the replacement kit includes it. This will facilitate smooth operation and extend the life of the cartridge and other parts in the faucet. Once the cartridge is in place, reattach the retainer clip and then install the spanner cap, if applicable. If the replacement kit does not include a spanner cap, you can get one from your local hardware or home center. Once the cartridge and faucet are reassembled, test the water flow and make any necessary adjustments. Once you’re satisfied that the faucet is functioning properly, turn the water supply back on gradually, checking for any signs of leaks or other issues.
Lawn Care and Landscaping Services
Lawn Care services include mowing, spring and fall clean ups, edging, aeration, and plant bed maintenance. Professionals also test soil to identify nutrient deficiencies and correct problems like fungus that can ruin grass.

Grass needs nitrogen to produce new growth, phosphorous to stimulate root growth, and potassium to strengthen the plant so it can resist environmental stresses like cold, heat, drought and lawn mowing. Regular fertilization keeps a lawn healthy and beautiful. Visit https://www.pristinecutslawncarellc.com to learn more.
A well-manicured lawn is the first thing that many people see of your property. That’s why it’s important to make the most of your curb appeal and give visitors and prospective buyers a great first impression.
Whether you’re looking to improve the look of your home or preparing it for sale, landscaping curb appeal is a key step. In fact, Virginia Tech research shows that homes with great landscaping sell for 7% more than similar properties without a well-tended lawn and yard.
When it comes to boosting your curb appeal, there are many things you can do that don’t require much time or money. Some of the easiest and most effective improvements include trimming overgrown bushes, mowing your lawn regularly, and applying fresh mulch. You can also add color with flowers or plants that complement your landscape. If you’re preparing your home for sale, consider choosing low-maintenance flowers that won’t litter the ground with petals or seed pods as they mature.
In addition to a clean lawn, it’s important to address any visual defects. Minor imperfections like broken window or door glass, chipped paint, or ripped bug screens are easy to fix but can have a negative impact on the overall impression of your house. An irrigation system can help you maintain a beautiful lawn by providing consistent watering with a dependable schedule. But don’t forget to schedule regular treatment for your system to ensure that it is working properly and delivering the right amount of water to your lawn and other plantings.
If you’re unsure about how to keep your lawn looking its best, a professional lawn care company can help. With a lawn care program, you can be sure your yard is weed-free and healthy. Regular treatments for weed control, fertilization, and aeration can keep your yard green all season long and increase the value of your home.
In a fast-moving housing market, first impressions matter. A home with a welcoming exterior is more likely to attract potential buyers and get your property sold quickly. To improve your curb appeal, contact us today to schedule a free estimate for your lawn care needs.
Health
Lawn care is the treatment of existing lawns to promote healthy turf growth and soil. It includes fertilization, weed control and disease management in addition to standard mowing, watering, edging and mulching. In contrast, landscaping services involve the transformation of outdoor spaces through planting, construction and design.
A basic lawn care service package includes mowing, weeding and debris removal. Some companies also offer aeration, seeding, and deep root feeding for trees and shrubs. Other services include pest control and fungicide treatments. Aeration loosens compacted soil, allowing it to better absorb nutrients and moisture. Lime applications help balance soil PH, which affects grass health. Weed control keeps invasive species from disrupting a lawn’s natural order and promotes healthy root growth.
Fungicide treatments prevent and cure a wide range of diseases that affect turf. Some of the most common include leaf spot, summer patch and brown spot. Aeration improves the flow of water and nutrients to grass roots, promoting a thick, lush lawn. Mulching conserves soil moisture, moderates soil temperature and suppresses weed growth.
Some companies use toxic chemicals to treat lawns, but others offer organic alternatives. These slow-release fertilizers and organic soil amendments are safer for families, pets and the environment. They also nourish the earthworms and microbes in the soil, which is a vital part of a healthy lawn.
Regularly scheduled lawn care is the best way to ensure a beautiful, thriving garden. A professional can handle the hassle of mowing, weeding and trimming, so homeowners can focus on other tasks. Recurring lawn care services are available monthly, bi-weekly or weekly, depending on your preferences and the needs of your garden.
To reduce injury, lawn care workers should wear gloves, long pants and closed-toe shoes. A first aid kit should be kept on hand to treat cuts, abrasions and chemical burns. A kneeling pad or scooter wagon can help reduce back strain from stooping, and a long-handled tool or attachment can make it easier to reach areas with low branches and flower beds. The Arthritis Foundation recommends that lawn care workers take frequent breaks, keep hydrated and use tools with handles that are suited to their physical ability.
Safety
Lawn care services include mowing and trimming, chemical spraying, fertilization, soil testing, aeration, seeding, mulching, weed control and tree and shrub health maintenance. It also includes landscaping, which transforms outdoor spaces by using plants and man-made structures like walkways, patios, decks, fire pits, pool areas and more.
Safety First should be a core value for anyone working in the lawn care industry. While this is a general rule for any workplace, the work environment in lawn care is more unpredictable than a factory floor and can be impacted by weather and other outside factors that make each day a new adventure. This is especially true for teenagers who may be operating lawn equipment as a summer job or helping out at home. Before beginning any work, read the operator’s manual and follow all recommendations for personal protective equipment, including sunglasses with impact resistant lenses.
Mulching – Adds organic matter to the ground that moderates soil temperature and moisture, suppresses weed growth and improves the appearance of flower beds. Some lawn care companies include mulching as part of their standard service while others sell it as a separate option.
Fungicide – There are numerous turf diseases that quickly deteriorate grass health, including dollar spot fungus, leaf spot, red thread, brown patch and summer patch. Many lawn care companies offer preventative fungicide treatments to keep turf healthy and looking great.
Pests – There are many pests that infiltrate lawns and ruin turf, from grubs to ticks to mosquitoes. Some lawn care services offer treatments that prevent and control these common pests so that you can enjoy your yard without worrying about them.
Pruning – Trimming trees, shrubs and bushes improves the appearance of the landscape and helps control weeds by preventing them from taking over. Some lawn care services also include limb chipping and stump grinding as part of their basic package.
Environment
Many homeowners want a well-manicured lawn with lush green grass and attractive flowers and woody shrubs. However, it is important to understand how your lawn care habits impact the environment. A well-maintained landscape requires a significant investment of time and money. In addition, many of the products and services used to achieve the desired results are not good for the environment. Fortunately, there are greener options for lawn care.
A healthy, natural lawn helps prevent erosion, reduces runoff and carbon dioxide emissions, and provides habitat for wildlife. Lawns also act as air filters, capturing dust and dirt that would otherwise pollute the atmosphere. According to Oregon State University, healthy lawns sequester more carbon than they release through photosynthesis and soil microbe decay.
The best way to protect the environment with your lawn is to avoid using chemicals. If you have to use chemical control, consider an organic product. These break down quickly and do not wash into storm drains and waterways, whereas non-organic products can pollute the environment with their runoff.
Another way to reduce your environmental footprint with your lawn is to water it efficiently. Over-watering your lawn wastes water and encourages shallow root systems, leading to more frequent need for fertilizer. Instead, water your lawn infrequently and deeply, which promotes deep roots and reduces the need for fertilizer.
Mulching and composting are also environmentally friendly practices that improve soil health, reduces the need for chemical fertilizers and fungicides, and promotes biodiversity. In addition, mulching helps to maintain consistent soil temperature and moisture levels, preventing excessive or inadequate watering.
Lastly, pest control is an important aspect of responsible lawn care. Surface insect preventatives keep harmful insects such as sod webworms and billbugs from damaging your turf. Insects that tunnel under the surface can be treated with grub preventatives, which stop them from eating into your lawn.
A final way to protect the environment with your lawn is by choosing native plants. These are adapted to your local climate and require less water, fertilizers, and pesticides than non-native species. They are also beneficial to wildlife and provide shade, which helps cool adjacent surfaces such as driveways and sidewalks.
Pest Control – How to Get Rid of Pests in Your Home
As warmer weather approaches, pests like rodents, ants, and cockroaches tend to increase. Pests can damage property and create health hazards. For example, rats gnawing on electrical wires can cause circuit breakers to trip and interrupt power. They also spread diseases such as hantavirus and salmonella. Contact Louisville Pest Control now!
There are many physical and biological pest control methods. For example, nematodes can be used against soil insects such as caterpillars and beetles.

The best way to deal with pests is to prevent them from entering your home. If they are not controlled before they become a problem, pests can cause damage and health problems. They can trigger asthma attacks, aggravate allergies, and spread bacteria like salmonella. They can also chew through wires, causing fires and other serious issues.
Prevention is the most effective form of pest control, reducing the need for and risk of chemical treatment. This is known as “Integrated Pest Management.”
You can do many things to prevent pests from entering your home. It would help if you started by removing all food sources for pests. This means storing all food in tightly sealed containers and keeping trash cans closed and covered. You should also keep wood piles away from your house and trim back any shrubs or plants close to your home’s foundation.
Pests are attracted to moisture, so you should ensure all pipes are properly insulated and that any leaky faucets or fixtures are fixed. Keeping humidity low by opening windows and using dehumidifiers can help prevent pest infestation.
In addition, you should clean up and dispose of trash regularly. Pests are also attracted to waste materials, so ensuring that counters and sink areas are cleaned and sanitized between uses can prevent pests from entering your home.
Another way to prevent pests from invading your home is to seal any cracks or crevices with caulking. This will prevent the entry of pests, such as rodents and ants. You should also keep all garbage in tightly sealed cans, take out your trash, and recycle regularly.
Suppression
When a pest population has grown beyond what is reasonable to tolerate, it may be necessary to control it. This is called eradication. Eradication is rarely attempted in outdoor pest situations, where the goal usually is prevention or suppression. In enclosed environments, however, such as dwellings, food processing, storage, and distribution facilities, and hospitals and schools, eradication is a more common objective.
Most people are willing to tolerate a certain amount of pest damage, but only up to a point. When pest damage becomes severe enough to jeopardize health, safety, or economic productivity, it is reasonable to take action. These levels of pest activity are called thresholds, and they differ for different pests. For example, roaches and bed bugs cause disease; rats chew electrical wires, which can result in expensive repairs and power outages; and termites consume wood, threatening the structural integrity of buildings.
Many factors influence whether a pest becomes problematic. Natural features, such as mountains and large bodies of water, often limit the growth of some pests by restricting their access to food, water, or shelter. The availability of nutrients in soil and the climate affects the success of some pest species by influencing the growth of their host plants.
Other natural controls of pest populations include predatory and parasitic organisms, such as birds, reptiles, amphibians, fish, and mammals, which prey on or kill some pests. Other organisms, such as nematodes, which are microscopic, eel-like worms that live in the roots of plants and feed on pests, also may suppress them.
If a pest infestation is so severe that the above measures fail to provide adequate control, pesticides may be used. If pesticides are employed, the home owner must be careful to use them sparingly and according to the label instructions, and keep them out of the reach of children and pets. In addition, all steps should be taken to prevent contamination of non-target organisms and the environment. For example, garbage should be stored in tightly closed containers and removed regularly; all spilled materials should be cleaned up promptly; leaky pipes should be repaired; and vegetation should not be allowed to encroach upon or overtake structures.
Eradication
Pests not only spoil crops and damage buildings but also harm humans and animals by transmitting diseases. Diseases caused by pests range from bacterial and fungal infections to invertebrates like mites, ticks, flies, ants, and nematodes. Some of these pests contaminate food sources, while others cause itching and irritation to human beings.
There are many ways to control pests and their infestation. For instance, you can use home remedies such as mint, geranium, or citronella to repel them by spraying these on areas that are infested. You can also make traps by mixing engine oil and vegetable oil in soapy water and placing it on pest-infested areas. Some traps are even reusable and can be made from materials found around the house.
You can also use biological pest control methods. This involves introducing the pest’s natural enemies to manage the population through predation, herbivory, parasitism, and other ecological processes. This is one of the oldest forms of pest control.
Another way to reduce the number of pests is to seal cracks, crevices, and holes in your home. This can be done by using duct tape, but caulk and plaster are better options in the long run. You can also trim back bushes and shrubs near your home to prevent pests from entering through these spaces. Finally, you can use insect-eating nematodes. These are microscopic worms that kill a wide variety of insects, including fleas, grubs, and cockroaches.
Eradication can be a very difficult task to achieve. It requires a comprehensive approach at community, national, and global levels, and relies on extensive financial and logistical support. Eradication programs must also consider private versus social net benefits, as well as short-term versus long-term net benefits.
A thorough pest control program can help keep your family healthy and safe. However, it is important to consult a professional before applying any chemicals to your home. Ensure that they have a valid license and certification from the local health department. Ask about their services and prices, as well as how they plan to protect your family from the harmful effects of pesticides. Also, be sure to get a written material safety data sheet for any chemical used in your home.
Treatment
Pest control problems can be costly, especially when they involve structural damage to buildings or food contamination. Often pests invade homes through open windows or cracks in the walls, foundations and roofs. They can also disrupt electrical systems by chewing on wires, causing them to trip and lose power. They may also cause diseases, such as those caused by cockroaches. It is important to get a professional to assess the problem and take steps to eliminate the pests and prevent them from returning.
Sanitation practices can help prevent and suppress pests by eliminating the pests or their food sources. For example, keeping food in the fridge or sealed in containers can prevent pests from accessing it. Regular garbage pickup and cleaning of food handling areas can reduce pests such as rodents. Improvements in farm and urban sanitation can also prevent the spread of pests between sites or from one species to another.
Chemical control methods use poisons, traps or other substances to kill or repel the pests. These can include aerosol sprays, dusts and baits. Some chemicals are aimed at specific pests, and others are designed to be less harmful to humans or the environment.
Biological control uses natural organisms such as predators, parasites or pathogens to attack the pests. These can be bred in the laboratory or introduced to the area in a controlled manner. They can be very effective against many pests and are generally considered a part of an integrated pest management program.
Eradication is a rare goal in outdoor pest situations, but it can be necessary for indoor or enclosed environments such as dwellings; hospitals, schools, and office buildings; and food processing, storage, and preparation areas. In some cases, eradication is the only option when a particular pest poses a serious threat to human health and/or welfare.
The best way to minimize the need for extermination is to prevent pest infestations in the first place. Perform regular interior and exterior inspections of the property to identify potential entry points for pests. Seal cracks, holes, and openings as soon as they are found. Maintain screens on doors and windows, and make sure the door sweeps are in good condition. Regularly inspect the roof and utility lines for signs of a leak.
Pest Solutions – Keeping Pests From Occurring in the First Place
Pests cause property damage and can be hazardous to health. Traditional pest solutions often involve chemicals that are harmful to pets and people. Click here to Learn More.
Sanitation can prevent and suppress some pests. This includes keeping garbage cans closed, regularly removing them, and fixing leaky pipes.

Prevention can also include traps and bait stations. These methods are most effective when predicting a pest’s activity is possible.
Prevention
The best way to deal with pest problems is to keep them from occurring in the first place. Regular inspections by experienced pest control professionals will identify problem areas and potential entry points before they become full-blown infestations. This early detection can save homeowners from extensive damage and expense, preserving their home’s value and peace of mind.
Preventive measures may include the installation of door sweeps, sealing expansion joints and locating dumpsters away from building entrances. These steps, along with a pest management plan that includes both preventative and eradication treatments, provide the best long-term results for any property.
While preventative treatments are effective for most pests, some require more invasive methods. For example, when cockroaches or flies invade a house, pesticides are often used to kill them, but it is possible to reduce the need for such toxins by addressing conditions that attract these pests in the first place. For example, regularly wiping and vacuuming floors removes food crumbs, trash, and fecal matter that can attract and sustain these insects, and drain cleaners destroy the bacteria that many pests rely on to thrive (see the section below on sanitation).
Rodents such as mice carry diseases like salmonellosis and hantavirus and chew through material to build nests. The resulting droppings and gnaw marks can also spread disease, contaminate food and create asthmatic and allergic reactions in people. Preventative control measures may include the use of traps, repellents and rat exclusion.
In commercial settings, preventing pests is equally important as it is in residential properties. Regular inspections should be done of the outside buildings, paying particular attention to foundation cracks, loose siding, and roof and utility lines. Maintaining landscaping, keeping woodpiles and debris away from exterior walls and cleaning out gutters regularly will also help to deter pests.
A successful pest prevention program involves everyone on the plant, from the c-suite to the loading dock. The degree to which employees understand and embrace the protocol a company has put in place will often determine how effective it is. For example, if fungus gnats and thrips are a problem at a greenhouse, establishing a spray schedule that targets these pests in their larval and pupal stages (see the section below on horticultural insecticides) will help to decrease their numbers.
Suppression
Taking preventive action is an important first step to preventing pests in the landscape or on your farm. Suppression tactics include traps, netting, fences, physical barriers and other control devices that can keep pests away from plants or inhibit their movement.
Physical control methods such as traps, netting and decoys can help you deal with pests without using chemicals. These types of controls may take some time to work, but they can significantly reduce pest populations and damage to plants.
Cultural practices can also disrupt the environment of a pest and prevent it from moving into new areas. Examples of these practices include planting pest-free seeds and transplants, removing plant debris from fields and garden sites, cleaning greenhouse and tillage equipment between cropping and harvesting, avoiding long periods of high relative humidity that favor disease development, managing irrigation schedules to minimize wet and humid conditions, and practicing field sanitation that includes avoiding carryover of pests and diseases from one field or operation to the next.
Many people think that when they see a bug or some other undesirable organism, the only way to eliminate them is with pesticides. However, there are many nonchemical solutions that can be as effective at controlling pests and often much more humane.
Chemical controls are typically easier to find and use, but they can also pose health and environmental threats when used improperly. It is important to understand the risks involved in a pesticide before using them.
It is also important to realize that, for the best results, integrated pest management should be used as a framework for solving pest problems. IPM uses a variety of tactics to prevent the introduction and spread of pests, with the goal of minimizing the use of pesticides. Pesticides are only used when monitoring indicates that they are needed according to established guidelines, and are applied with the goal of removing only the target organism. IPM can be used in urban, agricultural and natural or wildland or wildflower areas. For more information on IPM and its components, including pesticide selection and application, visit the UF/IFAS IPM page.
Detection
Detecting pests early in their life cycle is the key to controlling them. Pest detection solutions leverage advanced technology to enhance traditional inspection and monitoring methods by identifying pests and highlighting potential problem areas for remediation. These solutions can also help identify the type of pest and the extent of the infestation to inform more targeted and effective control methods.
Many of these pest detection solutions use sensors and cameras to monitor environments in real-time. The result is greater accuracy in detecting the presence of pests, especially when they’re small and hard to see. This improved detection can reduce the number of unnecessary and harmful spraying operations that may otherwise be triggered by inaccurate sensor readings.
For instance, a pest detection system using an improved version of the YOLOv5m deep learning model can identify insect pests at rates higher than 90%. This improvement was achieved through feature fusion to capture more relevant features and increase the receptive field of the network. Additionally, the model was trained with a larger and more detailed training set to further increase its recognition performance.
In addition to enhancing traditional methods, AI-powered pest detection systems can also improve crop protection, helping farmers save time and resources while reducing the need for pesticides on their fields. By analyzing data about pest populations, these systems can alert farmers to the arrival of an infestation before it spreads. This allows them to take action quickly and save their crops before they’re lost.
This type of precision and rapid response can minimize the damage caused by an infestation and reduce the need for broad spraying, which can harm the environment and the health of people working on the field. It can also help prevent the development of resistance to pesticides by lowering the number of applications used on a field.
Detecting pests at an early stage can significantly cut down on the amount of pesticide that is needed to eradicate them, which can reduce the risk of chemical-related health issues and environmental pollution. By enabling more targeted and efficient treatment plans, this approach can also lower labor costs and reduce chemical resistance, resulting in substantial monetary savings for the farm and the community as a whole.
Eradication
Eradication is a rare goal in outdoor pest situations, where the intent is often prevention or suppression. It is sometimes attempted in enclosed areas, where the goal is to eliminate a microbe-transmitted pest that can no longer be tolerated (e.g., Mediterranean fruit fly, gypsy moth, fire ants). Although eradicate literally means to “pull up by the roots”—as in yanking a weed—it has also come to mean to completely remove or exterminate something.
Sterile insect technology (SIT) is a proven eradication method for insects that threaten health, safety and economic vitality on a local scale, such as disease-transmitting mosquitoes or tsetse flies. SIT uses sterile insects to control their reproduction, offering an environmentally responsible, long-term solution that does not introduce non-native species into the environment. Other eradication methods occur at larger scales, such as quarantine or eradication programs for foreign plant pests that can damage domestic agriculture and industry. Examples of these types of regulatory control efforts include the eradication of invasive exotic plant species such as Brazilian pepper and the Asian citrus psyllid.